OME (Old Man EMU) Springs
Before I had this truck, I use to take my Chevy Sprint on fire roads. I would go up to 50mph and slide around flat
corners. The suspension on that car
handled the terrain very well and soaked up the bumps. It was fun driving rally style. Amazingly, the car has over 180k and still
runs strong with all the abuse. After
I bought the Toyota, I thought now that I have a real off-road vehicle, it must
be the smoothest riding vehicle there is. I
should be able to go twice the speed in comfort. Imagine my surprise when I took my sagging
spring 4Runner thru a washboard. The
washboard literally shook the car to pieces.
The horrible vibration was there no matter what speed I drove. After
a hundred or so punishing miles of off-road driving, I realized that the painful
jolts were caused by the springs hitting the bump stops. This fact was verified by taping a piece of
aluminum foil standing up on the end of the bump stop. The foil got crushed after driving thru just
a parking lot bump. That was too lame.
This immediately convinced me that I needed new springs.
OEM springs are expensive. Since
they are not lifted they might be no better in terms of handling bumps. According to newsgroup, aftermarket springs
like the ones made by NWOR were
poor quality and sagged after a year or. Springs made by Downey Off Road were
too stiff. Alcan makes good springs. However,
their springs are custom made. When
I called them and asked for a recommendation, they told me I could have anything
I want. The problem is I really don't
know what I want. There are so many
variables, unless I am a veteran four wheeler, there is no way I can spec. my
own spring and expect them to turn out right. The other thing is they make their springs
about 2" taller expecting them to settle in about a year. That means I would have to drive around with
quite a bit more lift than I want for a year. The question then became what
if one side settled more than the other. Then I would have a tilted car.
The only other choice was a local spring bender or Old Man Emu. OME has done lots of testing, and have come
up with a good combination of spring rates, damping etc. Plus, they have good reputation. I had been hesitant about putting a lift in
because I thought it would be complicated and time consuming to iron out all
the problems. The sales person gave
me assurance that it was a bolt on job. As it turned out, it took me a whole
year to get it right.
General
OME springs are well known for its quality because they stress relieve them
after forming so they do not go back to its original unformed shape. They do
not sag nearly as much as other spring. The main leafs of the springs have pads
on the end which rub on the adjacent springs. This limits the amount of rubbing
between springs to just the pads. OME springs are also known for the flat center
section that sits on the spring perch. I am not sure why a flat section is better
than a round section, but it does sound like a better idea. For the Toyota spring,
they paid attention to details to make a left and right front springs for the
truck.
Performance
The front springs flex quite well. In most obstacles, is the front spring that
flex. The rear is very stiff in compression, but ok in drop. Ride on washboard
is great, the springs and the shocks soaks up the bumps quite well as long as
you are going over 35mph. Conering on dry pavement is a little scary, but that
is probably due to the 30" tires flexing. With the stock 225/75 tires,
the truck corners almost the same as stock.
Shocks
I made the mistake of buying the standard duty shocks at first. That is the
reason I can compare the two. Now I have a set of standard duty shocks for sale
if anyone is still interested after my warning. Definitely get the heavy-duty
shocks even if you only go off-road once in a long time. The only harshness
in the heavy-duty shocks is going through dips on the freeway when the truck
drops like a rock. The standard shock set-up on the truck allowed the suspension
to "catch" the truck quite nicely on the same dips. I think the comfort
difference is not much. After all, the truck is a very rough riding vehicle
anyway. The difference is only between bad and little slightly worst. However,
the performance gain off-road is definitely worth it even if you only go off-road
once in a long time. When I had the standard shocks off-road, I kept wishing
it had just a little more damping. It was enough of a wish for me to buy the
new shocks.
The following shocks are available for the 85' 4Runner:
Available Shocks
|
|
|
Front Shocks
|
Rear Shocks
|
|
Less Damping
|
N93
|
N85
|
|
More Damping
|
N84
|
N95
|
The following table gives a rough indication of damping for the standard and
heavy-duty shocks. The shocks were fully compressed and allow to be extended
on its own under its own gas pressure. By feel, the gas pressure inside the
shocks felt about the same; therefore, the time it takes for the shock to extend
should be proportional to its damping performance. On compression, I did not
feel any difference between the standard and heavy-duty shocks. There was not
much compression damping in these shocks; which is good.
EMU Shocks Summary
|
|
|
Front Shocks
|
Rear Shocks
|
|
Free Rebound Time for Medium Duty Shocks
|
4.9 sec.
|
4.5 sec.
|
|
Free Rebound Time for Heavy Duty Shocks
|
8.5 sec.
|
8.3 sec.
|
|
Compressed Height (Center of Mount)
|
11.5"
|
14.25".
|
|
Extended Height (Center of Mount)
|
18.5"
|
22.75".
|
As seen in the table above, the rebound damping on the heavy-duty shocks is
quite a bit more than the standard shocks. This could definitely be felt while
driving. On the standard shocks, when it gets warm after about 5 miles of off-road
driving at about 30 mph, rebound damping is almost none existent. The truck
feels like it has no shocks. After hitting a bump, the truck would make a painful
bounce upward. It gets worst when going up a bumpy hill in 2WD. The wheels would
loose traction, and the driveline would unwind. When the wheels come down again,
it would cause a shock in the driveline. On the plus side, the standard duty
shocks work great on pavement. With the heavy-duty shocks on pavement, the ride
is a little more harsh when there is a dip in the road because the wheels cannot
extend downward fast enough due to the heavy rebound damping. Off-road, the
heavy duty shocks works great uphill and downhill. They eliminate the wheel
hop that occurred with the standard shocks.
Front
The front springs go on easily. I used the stock rubber bushing. I got them
for about $3-$4 each at Cabe Toyota. The special flattened out U bolt is not
necessary for the standard spring in my case. Is a good idea to get it anyway
incase there could be manufacturing tolerance which would make it necessary.
While I was at it, I got an adjustable torque rod. The stock one for some
reason was already under tension even with the stock springs. The following
are additional items needed to finish the front.
Longer Brake Lines
Longer brake lines are not absolutely necessary, but it really is a borderline
call. I got it just in case I happen to hit a large bump going downhill which
would stretch the brake line and cause it to pull off the fitting.
Repair of the Spring Perch
The front spring perch on my truck was bent out of shape. The corners were
bent downward as if there has been too much load on the leaf spring. I was
told this is usually from hard wheeling. The truck does not seem to have been
wheeled hard. OME sells a repair kit which basically consists of several plates
of steel to weld to the spring perch after it is repaired. The instruction
said to heat the spring perch until it is dull red, then use a sledge hammer
to straightening it out. It took about 5 minutes of heating with a welding
torch to heat the spring perch. After it is dull red, a few good stroke of
the hammer got it mostly straight. I then took it to the welding shop to lay
several beads of welds on top of the perch as well as the reinforcements.
The welding beads were then ground flat with a grinder again. The result was
a straight spring perch. The spring now has a nice single bend to it. Before,
it had a double bend.
Anti-Roll Bar
There are various opinions on anti-roll bars. Some say is not necessary while
others say is needed. Here are a list of items that cause handling characteristics.
From the above list, I think it depends on your particular truck. For the
EMU springs, the rear springs were much stiffer than the front springs. As
a result, the car would tend to oversteer. Adding the anti-roll bar back in
the front should compensate for it somewhat. I still find the truck to be
somewhat tail happy in a quick corner. Of course, I am use to driving a front
wheel drive car which understeer alot. For EMU springs, anti-roll bars were
needed. At least for me.
If you buy Downey's lifted leaf springs, they include extended rods for the
anti-roll bar. On the surface, these seems to work, however, in practice,
a longer rod will not work in off-road terrain. The EMU springs allowed for
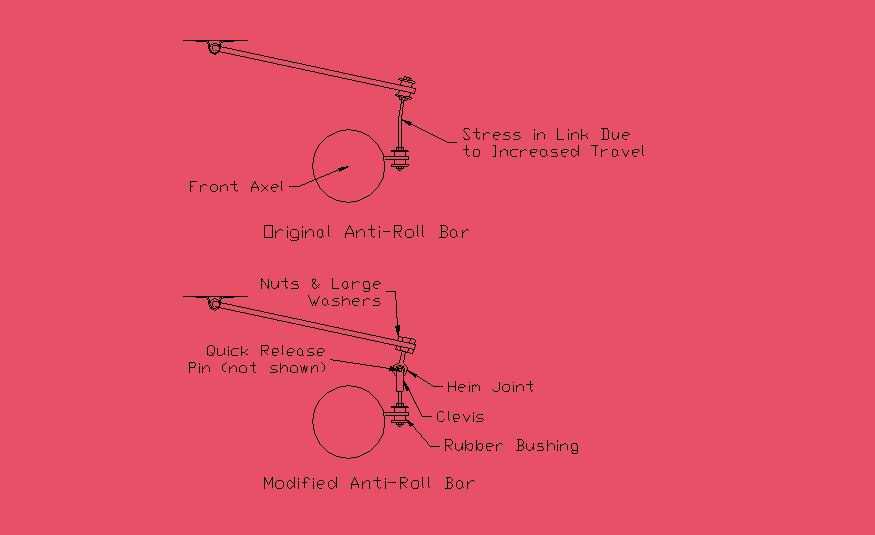
greater suspension travel. The stock anti-roll bar's weekness is that it will
only work with the range of travel that the stock spings have. The problem
area is in the two vertical rods that connect the anti-roll bars to the axel.
The rods are basically steel rods threaded on both ends. The bottom end of
the rod pass thru a horizontal hole in a bracket attached to the axel. The
top of the rod pass through a horizontal hole on the anti-roll bar. There
are rubber bushings that cushion and center the rod on the horizontal hole.
Although the horizontal hole is much larger than the rod, and allow the rod
to flex as the anti-roll bar goes thru its arc, with the added suspension
travel, the increase in arc of the anti-roll bar will distort the rubber bushing
so much that something will have to give. The rod will get bent as the suspension
goes thru extream flex. The solution is to include a heimi joint in the anti-roll
bar.
I decided to use a clevis and a heim joint from McMaster. The threaded portion
of hemi joint was bolted onto the hole in the anti-roll bar and fastened in
place with two nuts and large washer. The
clevis is installed on the hemi joint using quick release pins. The threaded end of the clevis is fastened to the bracket on the
axel with a bolt, washer and the original rubber bushing. This effectively put a pivot at the end of
the arm on the anti-roll bar to allow it to go through a larger angle change.
This worked great. The truck handled much better on lane changes and on twisty
mountain roads. I am much more confident doing an emergency lane change with
the anti-roll bar in place. The rear EMU springs are much stiffer than the
front springs. Stiffer rear springs cause the truck to oversteer. In a quick
lane change with the EMU springs without the anti-roll bar, the truck is likely
to fishtail. With the anti-roll bar in place, the handling is more neutral.
Most of the time, I am too lazy to take out the quick release pin for more
articulation since I am only playing around the local hills. The anti-roll
bar limits articulation. With the open differential, it is really challenging
to climb even moderate hills with the anti-roll bar in place.
I have to make several attempts and pick the exact right line to go
up.
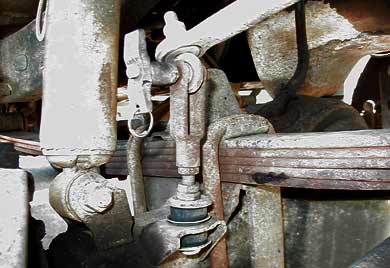
Picture worth a thousand words.
Rear Springs
Installation of the rear springs was quite straight forward. OME has the optional
side plate that prevents the shackles from rotating inward towards the axel.
This could be needed during hard off-road when the spring is under full flex.
I used stock rubber bushing in the rear. The hanger side of the stock spring
does not use the split bushing like all the areas on the spring, but instead,
it used a pressed-in bushing with a steel hollow shaft thru the center where
the bolt pass through. I tried to remove it to install on the OME spring, but
it was quite tight in there. Instead, I just used the rubber bushing like in
all other places. The pressed-in bushing was much stiffer than the split rubber
bushing. This could be one reason why the 4Runer tend to oversteer more in a
corner due to the flex in the rear bushing which cause the wheel to point to
the outside of the turn. I might latter replace the rubber bushing in that location
with poly bushing.
I noticed that the rear spring had one more leaf than the original rear spring.
This extra leaf was thicker than the rest and was very short. Since the added
thickness would mean that the u-bolts would be a little too short, I decided
to remove the thick short spring. Latter I placed it back on again.
The main problem with the rear spring is driveline vibration. Here
is the long story on the fix.
Update:
6/2003
It has been 4 years since the OME springs were installed on the car. The rear
springs had not sagged at all. This is probably due to the fact that the rear
is not normally loaded up. The front on the other hand probably settled about
1/4 to 1/2" The lift is still probably at 2.5" since it was quite
high when the springs were first installed. The shocks on the springs worked
great. The ride is still quite bumpy compared to a passenger car or the new
SUVs on the market.
7/2011
It has been 12 years since installing the OME springs. Happy to report that
it has not sagged much. There are some sag, but the lift is now pretty much
settled to 2.5" as promised. The springs have fully broken in, and are
relatively soft. Quite comfortable going over bumps. Unlike initially where
every bump was quite jarring. Now is just about perfect. With only about 4-5"
of suspension travel, the 4 Runner with OME suspension is definitely not a Ford
Raptor, so you have to go moderate speed in off-road, and slow down for the
large bumps.