This page is for the beginners trying to buy a quality camera that a typical photographer would use. There are so many cameras out there that it took me months of digging to figure out what is what. Even then, is a few more years to see in more depth the pros and cons of each camera. There are reasons for each camera. Trick is to find the one that has the right compromise for you. The information is out there, this is an attempt to summarize all that knowledge into a quick page. Hopefully, this will arm the beginner in an evening with knowledge to know where to start and look.
This is a quick discussion on basic terminology to understand camera difference. If you already know these, skip to Individual Camera Discussion below.
Resolution vs Sharpness:
See excellent examples the illustrate resolution does matter. The higher the resolution when you start with an image, when you reduce the picture size, the resulting image will be sharper.
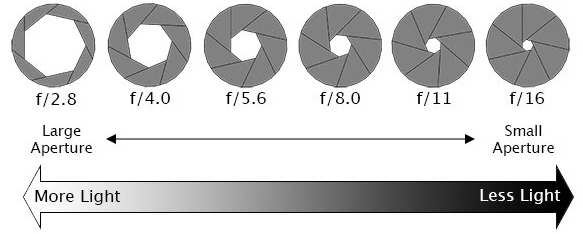
Aperture:
Difference between thousand dollar lens and hundred dollar lens is how big
the aperture is. Small f number means bigger aperture opening. Small f number
is good. f2.8 is a low number, and is a good fast lens. Typical good zoom lens
is f2.8. f1.4 is even better. You can only get f1.4 in a prime lens. Prime lens
are fixed focus lens. Less than f1 is almost impossible because the physical
aperture opening is so big. About f.95 is probably the practical opening limit.
Leica 50mm f.95 Noctilux-M cost $11,000.
For zoom lens, you want only one f number in the spec. f2.8 means entire range
of zoom is at f2.8. Is called a constant aperture zoom lens. If it said f3.5-5.6
for a say 16-85mm zoom, that means f3.5 at 16mm wide angle, but smaller aperture
of f5.6 at 85mm tele end.
Larger aperture allows more light into the sensor for faster shutter speed.
Larger physical aperture opening also will blur the background better to isolate
the subject for better artistic look. Typically, larger aperture (lower f number)
lens are larger, heavier and more costly to make. Manufacture can always just
put a very large apeture on a lens, but if the rest of the lens is not properly
designed, you will get blury picture.
These are f number from large aperture (small f number) to small aperture (large
f number). Each stop doubles the light going thru the lens. That means you can
increase shutter speed by twice.
f0.7-> f1.0->f1.4-> f2.0-> f2.8-> f4.0-> f5.6-> f8->
f11-> f16-> f22-> f32-> f45
Interchangable Lens: Cameras that can change lens because no one lens can do it all from wide angle to zoom, and still have large apeture, and be small and light weight. Most cameras on this page will be interchangable lens type. There will be some that has a build in lens. They have their place because they are usually small, light and lower cost.
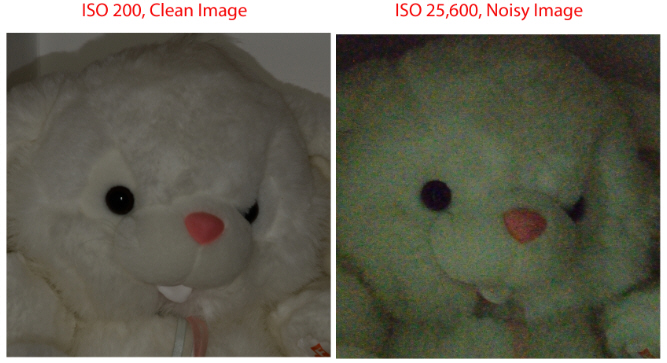
ISO: How bright a picture is given
a fixed amount of light. There is a penalty to pay when using high ISO to compensate
for low light. Penalty is high the ISO results in degraded noisy picture. ISO
measurement is set by ISO 12232 standard. When choosing a camera, there are
3 kinds of ISO in order of importance: base ISO, native ISO and expanded ISO.
Base ISO is the "best" kind of ISO. If you let a sensor convert light
into electrical signal, and no amplification is done to the electrical signal,
that is base ISO. The lower the base ISO, the better because you get less noise
and more dynamic range. The lower the base ISO, the more expensive it is to
manufacture the sensor. Typical base ISO is 100. Top quality cameras like Nikon
D810 has base ISO of 64. That is why people raves about the image from a D810
camera. There are no downside to having a low base ISO, the lower the better;
you can always bump up the ISO. See discussion
by falconeyes.
Bumping up the ISO is the next kind of ISO called the native ISO. Native ISO
takes the electrical signal and amplifies it or reduce it. Typically, amplification
is up to 16x to go from ISO 100 to ISO 25,600. Amplification is what happens
in the sensor chip when you set the ISO anything higher than base ISO. Analog
electrical signal that corrspond to the amount of light sensed is amplified
first before is sent to the A/D converter to convert into digital signal.
The last ISO is expanded ISO. The camera software multiplies the output from
the sensor chip before saving it on the memory card. Expanded ISO is no different
than brightening a picture on a computer.
There are a lot of discussion on which ISO figure is significant. The base ISO
gives an idea how good a sensor is. The lower the better. The native and expanded
pretty much makes no difference. You can brighten the picture in the camera
or do it in software.
ISO Invariance
The latest discussion is ISO invariance. This means you purposely set the ISO
lower than required for proper exposure. This means the picture comes out very
dark. In the software brighten up the picture to the proper level. This is especially
useful if there is a bright background like the sky. By starting with a dark
picture, the sky is not overexposed and just all white. You will get good details
in the sky as well. Some cameras like the D810 with 64 base ISO is very good
when doing ISO invariance push. Others like the Sony a9 is not as good.
Sensor size:
Consideration 1: Image Quality with High ISO
Advantage of sensor size is light capture. Larger sensor capture more light.
With larger sensor, you can increase the ISO to a higher number, and not get
noise in the picture. The large the sensor, the less noise at high ISO setting.
(Reference).
Picture noise with high ISO setting. Extreme example shown below.
See how fast you must decrease the ISO for smaller sensors to keep the same
noise free picture. Assumes all sensors have the same number of pixels. Graph
starts with ISO 1,600 on a full frame camera. This should convince you why larger
sensor has advantage in low light.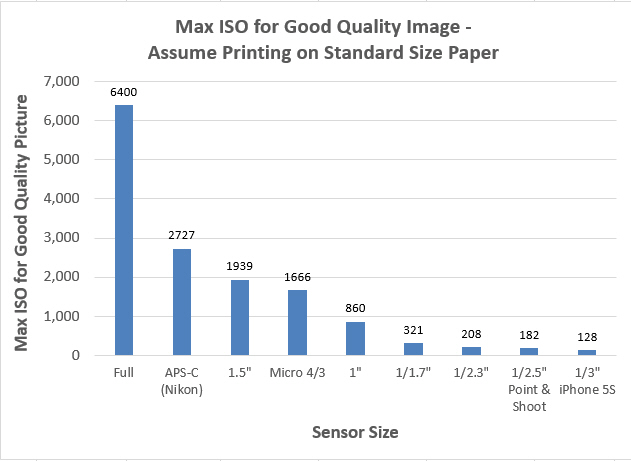
Assume ISO 6,400 on a full frame camera is the limit for good noise free image.
For the same number of pixels on other cameras, here is what you can expect.
The smaller the sensor, the more you must lower the ISO to have noise free image.
ISO 6,400 on full frame is same as ISO 2,727on APS-C. Keep in mind these are
theoretical calculated base on sensor area. For Micro 4/3, max ISO would be
1,666. 1" sensor, max ISO is 860. Down to iPhone 5S, max ISO is only 128.
However, iPhone fix this by having only have 8MP resolution, so is no where
near 24MP for full frame Nikon D600 or 36MP of D810. iPhone can only have so
many pixels because the smaller the pixel, the more noisy the picture will be.
Do realize that when you downsize a high resolution picture to smaller size,
the noise also go away. Nokia Lumina 1020 has an ultrahigh resolution of 41.3MP
on a 1/1.5" sensor. That is a crop factor of 3.2. The sensor is slightly
smaller than a 1" sensor. Each pixel on that sensor is very small at 1.2
micrometer. We would expect that at anything over ISO 100, the noise would not
be acceptable. However, when you resize the 41.3MP back to 16MP of a similar
1" sensor camera, we would expect the noise to be pretty much the same.
Why did Nokia pack so many pixels into the small sensor. If you are shooting
in bright light, then you can lower the ISO, and get high resolution pictures.
In low light, noise would be horrible, but you downsize to lower resolution
for acceptable noise. If you have to pick, higher resolution is always better.
There is almost no downsize to high resolution other than it will fill up the
harddrive faster.
Therefore, you notice that micro 4/3 cameras usually only have 16MP resolution
to preserve high ISO picture quality. One more point to consider is if you have
2 sensors of the same size, and one has say 10MP while the other have 20MP,
you would expect the 20MP sensor to have more noise since each pixel is smaller.
That is correct. However, if you reduce the size of the 20MP picture down to
10MP, you will average out the noise, and get just as good of a picture as the
10MP sensor. If you go to "Compare Camera Sensor" in DxOMark,
and look at the ISO noise graph (SNR 18% under "Measurement"), you
will find two buttons, "Screen" and "Print". Screen is actual
size. Print is down sample to picture size. High MP camera may have high noise
when "Screen" is pressed, but when "Print" is pressed, you
will find that high MP camera will have about the same noise as a similar low
MP camera. Sensor technology are about the same will all cameras over last several
years. (Ref
Lensrental article) Over the years, is the dynamic range that has improved
dramatically, and dynamic range is irrepective of sensor size. Therefore, you
will hear many people with micro 4/3 camera say their image quality is every
bit as good as full size DSLR camera. They are talking about dynamic range.
Dynamic range is being able to record very bright and dim light in the same
picture.
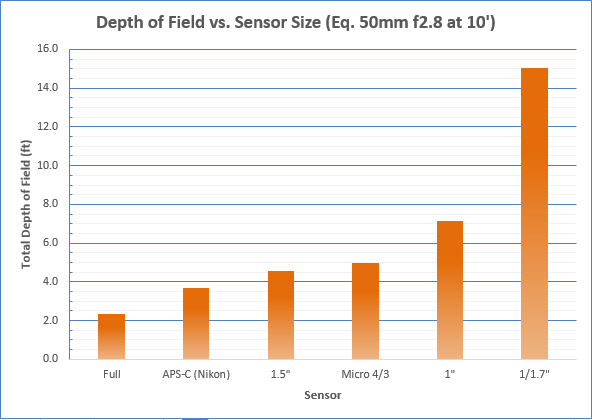
Consideration 2: Depth of Field
The larger the sensor, the less depth of field. Low depth of field can be a
good or bad thing depending on what you like to accomplish. Typically, with
a portrait, you want shallow depth of field to blur out the background and isolate
the subject. With landscape, higher is desirable. Below, you can see depth of
field increase as sensor size gets smaller. After about 1/1.7" sensor size,
depth of field is large enough that majority of the picture will be in focus.
In the chart below, as sensor size gets smaller, a lower focal length is used
to maintain the same magnification. Since different focal lengths are used,
depth of field changes with different size sensor.
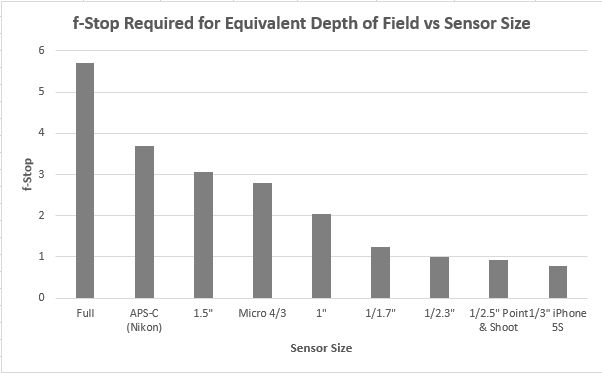
Second graph is what happens if you like to have the same depth of field. The
way to accomplish that is to use higher f-stop (smaller aperture). Note that
to generate the chart below, an equivalent of 50mm lens is used for each of
the sensor size. Note that for iPhones, having a high depth of field is almost
not practical, you will need a lens with f-0.78. Those types of lens are very
expensive.
The follow on from the graph above is that for a full frame camera, inorder
to achieve a high depth of field, you will need to increase the f-stop. There
are some drawback to increasing the f-stop, to have the same exposure, you will
need to increase ISO or decrease shutter speed. Assuming you are not decreaseing
shutter speed because you don't want motion blurr, then you have to increase
ISO. Below is how much ISO you will need to increase to have the same depth
of field as a M4/3 camera.
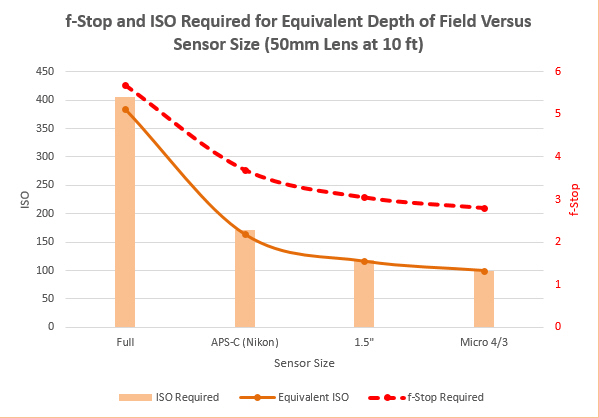
Therefore, if you are using ISO 100 f2.8 on a Micro 4/3 camera, to get the same
depth of field on a full frame camera, you will need to use f5.7. Since you
are using f5.7 on a full frame camera, if you keep the shutter speed the same,
you will need to increase ISO from 100 to 384, or about 400 because most camera
do not have an ISO 384 setting. The question is will picture quality degrade
due to increase in ISO. Answer is that the larger full frame camera can use
higher ISO, and still have low noise. The line "Equivalent ISO" shows
how much you can increase ISO on a full frame camera and not have degraded piccture
quality due to noise. Is interesting to note that ISO picture quality keeps
up with required ISO for the same depth of field. Conclusion is you need higher
f stop on a full frame camera for the same depth of field, but you don't loose
image quality.
Note that we only say picture quality due to high ISO noise does not change,
but we have not talked about picture quality due to loss in dynamic range from
going to high ISO. Here is a comparison from DxO
Mark. You can see that with larger sensor, dynamic range also increase,
but with high ISO, dynamic range do decrease. In the end, dynamic range is about
a wash at least if you compare OM-D E-M1 micro 4/3 with Nikon D7100 APS-C with
Nikon D810 full frame camera.
Conclusion, full frame camera give you flexibility to either have low or high
depth of field.
Lens Size: Weight of lens goes up as the square of sensor size. Twice the sensor size means lens weight goes up 4 times. If you are hiking the entire Pacific Coast trail or the Appalacian trail, weight does matter. If you are doing street photography, pointing a smaller lens at a stranger might be less intimidating. Separate page on this web site that describes lens size comparison in more detail.
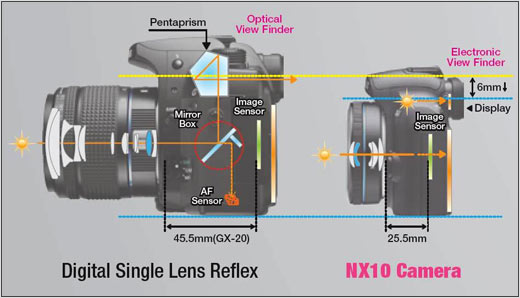
DSLR: Traditional cameras are DSLR. There is a diagonal mirror in front of the sensor the direct light to the view finder so you can see the image. When shutter button is pressed, camera raise the mirror first, then the shutter in front of the sensor opens to expose the sensor. Why can't the mirror act like the shutter. It probably can, but mirror is heavy and can't move as fast as the thin shutter in front of the sensor. There are other issues with uneven exposure as well.
Mirrorless: Don't have a mirror, but use the sensor with an electronic viewfinder for framing. This makes the camera thinner and simpler. Mirrorless still have a shutter in front of the sensor. Shutter is normally open for viewing. When shutter button is pressed, shutter closes first, then re-opens to take the picture. All the rage is mirrorless could be cheaper, and smaller. They are definitely smaller, but right now seems to cost about the same.
This post on dpreview.com sums it up best. Basically, mirrorless will almost never be as good as DSLR for fast reaction photography or for pictures where you need timing for the right moment. Mirrorless with the electronic view finder will always have a lag, and by the time you see the moment in the viewfinder, the moment is already gone. You can make a faster viewfinder, but then it takes more processing power and less battery life.
Mirrorless vs DSLR: On going debate as hot as Democrats vs Republicans. Many photographers have both types of camera anyway. See lower section on this page Jump to lower section.
The Sony A7R can not focus as well if not better than DSLR in low light condition.
Auto Focus:
DSLR bounce light off the mirror into a phase detect sensor for focus. This
DSLR
focus mechanism has been perfected by decades of experience from Nikon and
Canon, and is exceedingly good.
Mirrorless use contrast detect auto focus.Camera moves focus little at a time
until lines are sharp. This can be a slow process. Auto focus has been improving
for mirrorless. Fixed object focus is fast, but none of the mirrorless cameras
can keep track of an moving object very well.
Note that contrast detect is more accurate than phase detect focus.
Hybrid Auto Focus: Some newer sensors have phase detect focus cells right on the sensor. Phase detect focus is what is used on DSLR with the sub-mirror. Here on the sensor, there is a special micro lens on top of it that splits individual light rays to a tiny auto focus cell on the sensor. So far, these small auto focus phase detect cells are not as good at tracking moving objects as traditional DSLR. The only exception is Nikon 1 that has excellent focus tracking. Canon 70D is first to have this feature. It can also autofocus at as low as 0EV light.
Viewfinder: If you ever use a manual
focus film camera with a good viewfinder, you will see what a joy it is to focus
a lens. Gives you so much control and feel to see an image come into focus.
You can do it quickly too. More rewarding to shoot a manual focus with a good
viewfinder camera. Unfortunately, most DSLR do not have large viewfinders to
do that. Magnification is typically .5X up to industry leading .76X for Canon
EOS-1DX. Equivalent magnification is given with a full frame camera and a 50mm
lens. For crop sensor, divide by the crop factor. ie: For Nikon D7000 1.6 crop
factor APS-C, the magnification is .94X. The equivalent full frame magnification
would be .94/1.6= .58X. At .58X, you can forget about trying to focus any manual
lens with that kind of magnification. Been there, done that, does not work.
Best solution is KatzEye
focusing screen. They have a split prism to line up the image. For DSLR, large
optical viewfinder is very important if you want to focus manual lens. In the
old film days, magnification was typically .85X with the Olympus OM-1 with .92X.
For mirrorless, viewfinder are important because LCD screen can be difficult
to see in sunlight. DSLR has optical viewfinder. Mirrorless has electronic viewfinder.
Like a computer monitor, electronic viewfinder has some disadvantage. One is
lag. For sports, you will not catch the right moment with the lag. The other
is contrast and details. Electronic viewfinder can only show a certain amount
of variation in light, so a lot of the details are missing. One advantage of
electronic viewfinder is camera can show with flashing shades where there is
overexposure or underexposure on the picture. Can also show a histogram that
is basically a graph of brightness, and number of pixels at that level of brightness.
Liveview: DSLR camera has a function
where camera moves the mirror out of the way and turn on the sensor. Now it
will use the rear LCD screen to frame the image. This acts just like a mirrorless
camera. The focus is not contrast detect rather than phase detect just like
mirrorless. DSLR focusing this way is painfully slow because the typical DSLR
lens is not designed to move a little at a time like mirrorless cameras are.
Canon 70D with phase detect cells on the camera is the exception. It can use
the micro phase detect cells to focus the lens fast.
Note that with DSLR, in movie mode also use the slow contrast detect. Auto focus
on DSLR movies are therefore horribly slow, and with lots of hunting. Canon
70D and newer DSLR with phas detect on the sensor are the exception. The 70D
focus very well in liveview and movie mode, but still not perfect.
Mirrorless are engineered to be fast at contrast detect focus. Therefore focus
for movies on mirrorless camera is much faster. However, many mirrorless cameras
still have issues during movies because they keep focusing on different objects.
Most people just use manual focus for movies.
Electronic Shutter: Electronic shutter are not fast enough to capture motion. A moving object will result in distortion. Note: Even if the electronic shutter is rated at 1/16,000 second, that is only good for bright light. The slow scan rate across the sensor results in object moving as picture is taken.
Anti Alias Filter: Picture of closly spaced lines can cause dark pattern of bands to appear. Is called aliasing. See the dark pattern in the garage door below. To fix this, a anti alias, or AA, filter is place in front of the sensor. Is a fancy name for a piece of glass the blurs the picture. The good thing is the picture now is too blury to have aliasing, but the bad thing is the picture now is slightly more blury. The latest trend is camera makers are taking away the AA filter to make pictures sharper. Typically, when the resolution of the sensor is very high, aliasing is less likely to appear. Therefore, manufacture use a higher MP sensor, and take away the AA filter. Down side is each pixel on the sensor is now very dense, so it can't gather much light. You get noise when you increase the ISO in dark shooting.
 Source:
pro.sony.com
Source:
pro.sony.com
Stabilization: Nikon and Canon has optical stabilization in some of their lens. Olympus, Pentax and some other manufacture has stabiliization on the sensor in the body of the camera. Sensor stabilization has the advantage that whatever lens you put on will have stabilization because stabilization is in the body of the camera. Olympus and some other camera even has 5-axis stabilization. It stabilize up, down, rotate and tilt horizontal and vertical. Reason Nikon and Canon use lens stabilization rather than camera stabilization.
Dynamic Range: Being able to capture bright and dim light without blow outs. DxOMark rates sensor on dynamic range. Example of a poor dynamic range camera. This particular camera was an ebay special called the Probe 99 by Quark in 1998. The dirt path reflect sunligh, and was completely washed out. The pants was black, and had no details.
Sync Speed: Important when doing fill flash while shooting towards the sun. The burst of the Flash light is fast at about 1/1000 sec. Your subject gets its light mainly from the flash, while the rest of the background gets bright ambient light from the sun. You want the shutter to open quick, but no shorter than 1/1000sec to capture the flash. Any longer, and the background will get flooded by ambient light from the sun. However, most camera limits shutter speed to 1/100 when using a flash. This is called the max sync speed. Better cameras as fast as 1/250sec. Is far short of the 1/1000 burst from the flashlight, so don't worry about sync speed being too fast. Faster sync speed means less light from the sun on the background while you are lighting up the subject with the flash. Faster is good.
Focus Peaking: Using manual focus lens
on digital camera is hard. Digital camera uses a crop sensor for cost, so image
is smaller. Viewfinder image is smaller too. Is very hard to tell whether picture
is in focus. Film camera had .85 up to .92 for OM-1, and this was with full
frame camera, so focusing is easy. APS-C even with 1x magnification is only
.66 magnification compared with full frame. For mirrorless, focus peaking overlay
a line around edges of object. The sharper the object, the thinner the line
to indicate focus. Many people swear by this. Ultimately, is a joy to use a
manual focus with large high magnification viewfinder, but focus peaking helps
in the electronic world.
ISO: Article
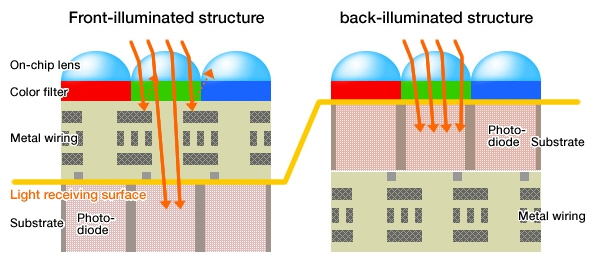
Back Side Illumination Sensor or Back-Illuminated Sensor
(BSI or BI): The wiring on the BSI sensor is behind photodiode
instead of in front of it. This should be obvious, putting the wires behind
photosensor lets more light pass to the photodiode. That would increase light
gathering ability. However, manufacture of Back Side Illumination (BSI) is very
difficult. So far, Sony made an 1" sensor used in the RX100 and Canon G7
X. iPhone4 claim to fame was BSI sensor. Larger sensors are more difficult to
make. For the 2014 Phototinka in Sep, Samsung made a shocking announcement that
their new NX1 will have a ASP-C sized BSI sensor. Claim is improved ISO and
dynamic range along with ultra fast read. Initial photo samples from ImagingResource.com
showed very good results. Results are almost as good as Nikon D750 full frame
camera. If I were Nikon and Canon, I would be worried, very worried.
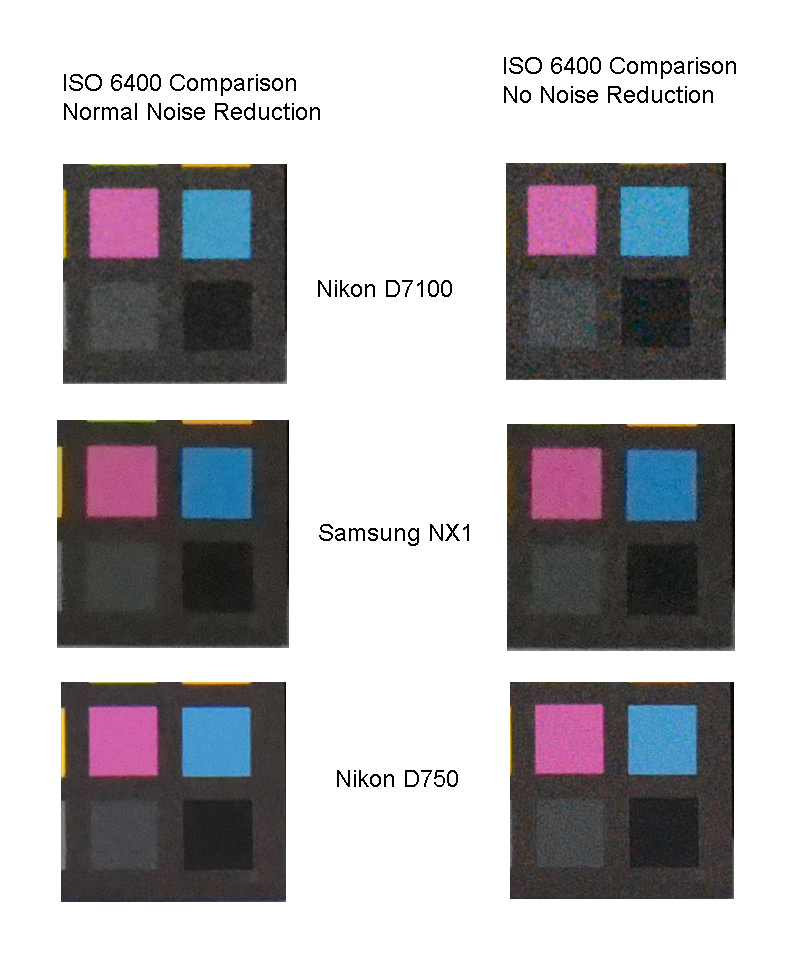
Comparision of Samsung NX1 with industry leader D7100 ASP-C camera and D750
camera. Samsung is shockingly good. Click on for larger image. Source: ImagingResource.com
CMOS vs CCD: In summary, CMOS is a faster
sensor, it can take pictures faster, and is cheaper to manufacture. CCD is much
more expesive to manufacture, and inherently is slower at taking picture, and
require more power to operate.
Lower Noise: CCD has larger sensor area than CMOS because CCD does not have
circuits on the surface of the chip, so sensor area is larger. But that is all
overcome by back side illumination, BSI, (see above) for small chips. BSI is
too costly for larger chips, and also less advantageous because sensor area
to circuit is larger on larger chips. This is assuming larger chips have about
the same pixels. Samsung has made the NX1 with larger chip and high pixel count
with BSI. That is a very good sensor. Also, in modern camera, CMOS compensate
for noise by improving the
read noise.
Global Shutter: CCD take the picture all at once. Takes about 1/10 to 1/30 sec
to scan the sensor. CMOS takes the picture one line at a time. Difference is
if the subject moves during the picture, there will be distortion on a CMOS
camera. Manufacture compensate for that by having a mechanical shutter that
are typically 1/250 to move across the sensor. However, for video, where there
is no shutter, CMOS camera would have distotrtion when moving the camera across
the scene.
Last cameras to have CCD are
Canon's PowerShot G12, Nikon's Coolpix P7100, Olympus's XZ-1, and Panasonic's
Lumix LX5. Leica M9 is also CCD. Old D100 is CCD. Paper on noise.
SD Cards: All you need to know about
SD cards in one diagram.
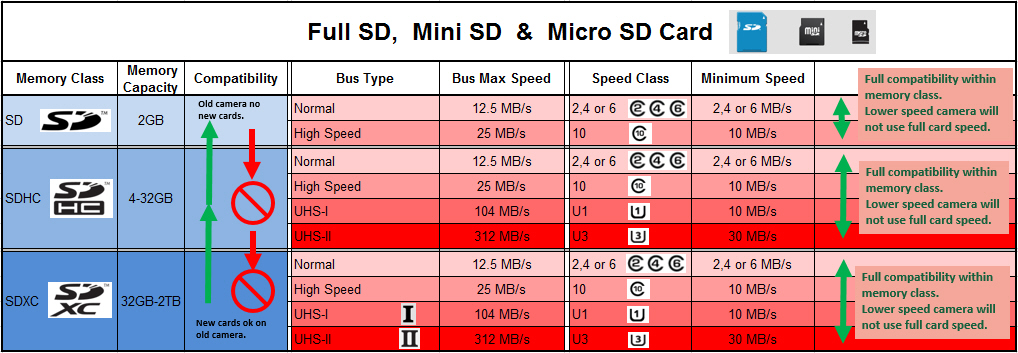
For speed rating, manufacture gives either in MB/s or multiplier like 600X.
To conver 600X to MB/s, multiply by .150. Therefore, 600 times .150 = 90MB/s
More details: Speed rating white
paper from Lexar.
There is a strong debate over DSLR and Mirrorless. Claim is with mirrorless, the lens weight less because the lens is closer to the sensor, so designer can make a smaller lens. The weight of the lens is actually about the same for both types of camera. See this page on this site.
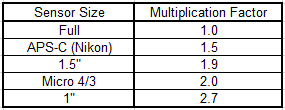
1. Sensor size. This is simple, the bigger the better. If you look at DxOMark rating, high ISO noise, dynamic range, tonal range all gets better with larger sensor size. ISO for sure is related to sensor size. An argument can be made that dynamic range is somewhat independent of sensor size. Micro 4/3 sized sensor come pretty close to APS-C sensor in terms of dynamic range. M4/3 proponent say you cannot tell the difference. I can tell the difference although is slight. See handy chart on sensor size.
2. Lense aperature. This is the f number. Smaller the better. f2.8 is the standard for a good zoom lense. f1.4 is very good for a prime lens. Low f number lets in more light, and reduce depth of field for better subject isolation. More info here for depth of field.
3. Autofocus speed and frame rate. There are no standard for measuring auto focus speed, so just have to read user reports and comparative reviews. Watch for the bias or incomplete reviews.
4.Zoom range. Most zoom mm is given as if it was a traditional 35mm camera.
For APS-C sensor, multiply zoom by 1.6. For 4/3 sensor, multiply by 2. For focal
length, 43mm, and some people say 50mm is normal lense. You want wide to be
24mm, so on APS-C, that is 16mm. For tele, 70mm is typical everyday zoom, 200
and above is for sports and bird watching.
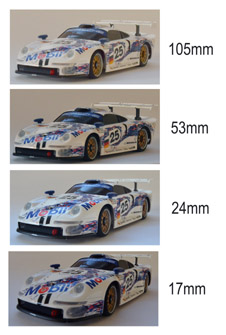
Zoom does 3 things for you. 1. Get closer to the object. But you can also just
walk up to it. 2. Change the perspective. This is useful to change the look
of the picture. See below on how zoom change the perspective of the picture.
You can determine which version you like the best. Bottom one make the front
wheel larger than the rear wheel. Gives a more 3D effect, but distorts the picture.
Has a more fisheye effect. Long zoom has less 3D effect. Picture is more flat.
It is good for portrait where you don't necessary to distort the face or the
body. ie big nose small ears. Typically, high focal length makes people look
thin while wide lens makes people look large, so choose wisely. 3. High zoom
compress the picture while wide zoom gives more depth. Airplane over moon picture
is good example. That is done by a huge zoom lens. Makes the plane and moon
appear to be at the same depth.

5.Magnesium case - Not necessary, but more durable and weather proof. The main thing about weatherproof is not to shoot in rain. Rather is for dust proof if is used outdoors. There are too many delicate mechanisms in the SLR for dust to mess up. There are delicate shutter mechanism, auto focus lens and the image sensor. You don't want fine dust to get in there. Realize dust particles come in many different size. From coarse sand to microscopic sand particles. One of those on the shutter mechanism is bad.
Interesting secret:
Per DxOMark, they have done some testing to show that with digital camera, a lower f stop lens that you pay more for may not actually give you as much benefit as numbers suggest. Problem is with larger aperture, the lens gather more light. That is a good thing because we want more light especially for a dimly lit room. However, when it tries to gather more light, some of the extra light it gathers comes at the sensor at a higher angle. With film, it does not matter since film is just a flat plane. However, with CMOS sensor that most camera uses, the sensor is not just a flat plane, there are filters and mirco lens in from of the sensor. If light is coming at an oblique angle, the micro lens may not be able to focus that oblique angle light onto the sensor. Is a secret that camera maker raise ISO without telling the user when a low f number lens is used. From f2.0 to f1.2, Canon and Nikon camera increase the ISO by half stop. (Not much, but still something.) Sony is worst according to the article. They raise ISO by the same half stop going from just f2.0 to f1.4. Will not affect too much in real life, but is something interesting to be aware of.
Use for manual focus lens. Manual focus force you to stop and think about composition. There is also a nice nostalgic feel to the lens. I like the simplicity and the control of manual focus. There is a site, MFlense dedicated to it.
The two I tried are focusingscreen and katzeyeoptics.
Focusingscreen.com gives you the tool and shims for installation and focus adjustment if needed. Their screens are modified Nikon parts. The microprism focusing screen was are pretty good at close range and good light. But...
The katzeyeoptics are way better even though focusingscreen.com use OEM Nikon screens. Katzeyeoptics snaps into focus way better than Focusingscreen's Nikon screen. You get much more accurate focus. Katzeye has split prism with surrounding microprism. Their microprism was so good wish katzeye did one with all microprism. Find that on the D7000 with the smaller view finder than a traditional SLR, split prism is not as helpful as microprism. Split prism is good only when there is a well defined straight line with sharp contrast.
With both, there were slight forward focus. Nikon D7000 camera came with a .1mm shim on the focusing screen. Had to use the one from focusingscreen, which was also .1mm, but was plastic, so I sanded it down to .05mm. That fixed the forward focus. Note katzeyeoptics don't come with shims, only installation tool. You may have to cut one with a razor blade out of some shim stock from McMaster or similar if you need to adjust the focus. Take shim out if camera is front focus. Add if rear focus.
On the D7000, if you are going the manual focus route, be sure to get the DK-21M magnifier piece also. Helps with focusing a lot.
Source:
http://www.focusingscreen.com/ - Focusing Screen
http://brightscreen.com/styles.html - No experiance with them, but their screens are expensive.
http://www.katzeyeoptics.com/page-- Katzeye screens have shallower DOF so objects snap into focus. But with the plus screen, it will need exposure compensation with f2.8 or higher lens. The screen scatter the light differently than OEM screen, so exposure sensor don't see the light, and gives wrong exposure. Note that before taking a picture, camera opens the aperature to the largest diameter to give you the brightest picture in the view finder. This is also the time that the light meter in the camera measures the light coming in, and adjust accordingly. Therefore consider the max aperature of the lens. If is f2.8 or higher in numerical value, and you use spot metering mode with the katzeye screen, exposure will be wrong. With f4 lens, exposure is too bright by 1 EV. Usually, this is not an issue.
Opinions on focusing screens: http://forums.dpreview.com/forums/readflat.asp?forum=1021&message=31502753&changemode=1
Beware that light source with different white balance will cause the focus to change. See article. Newer Nikon lens typically have compensation for light with different white balance. Typically, older AF lens like the screw type do not compensate for color. Typically non-Nikon lens also do not compensate well. Be aware when buying non-Nikon lens. I have not heard much complaints, but is my experiance.
The worst way (for me) Testing focus calibration with Morie pattern. I found this hard to use. Look at the repair manual below for a better method, and is the official Nikon method.
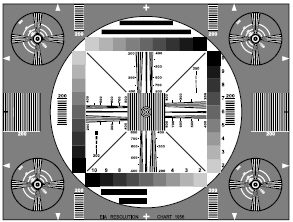
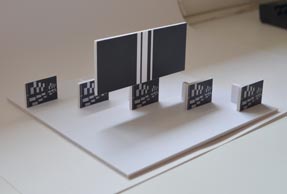
Typical way. This site has many links on lens focus calibration using a chart at 45 degrees.
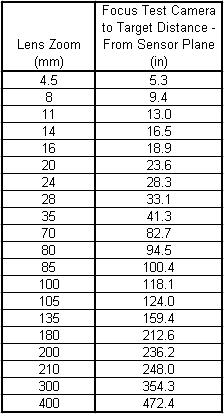
The best way: The Nikon way. Ever wonder how to fix a Nikon lens: Repair manual. Look at the last pages, it has a focus test fixture template you can build that works really well. May not be absolutely as precise as the 45 degree chart, but you end up being more accurate because is easier to use, and pictures are perpendicular to the focal plan, so you get a better reading. In the end, when everything are considered, you will get better results than the 45 degree chart. Note below the distance that the camera should be tested at base on zoom of the lens.
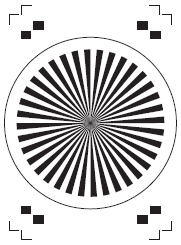
Newer way to focus - Dot Tune:
Use along with Siemen Start Focus Chart or Focus Test Chart
Siemen Star Focus Chart:
Focus Test Chart