Nikon D7000 Guide
The manual that comes with the camera have two short comings. First since it is an OEM manual, it has to be written for people who have no prior experience with electronic device. Everything are step by step from the very basics of what a menu is. In reality most people already have computers, smart phones, microwave ovens etc. They already know how to manuver thru the menu and set the clock. Is just a matter of knowing where everything are and remembering how to get there. This book takes advantage of the fact that most people are already familiar with electronic devices. The fewer steps in the guide make for a faster read. Instead, I try to explain the menus and options in terms of the logic of the layout. Once you understand the logic, is easier to remember where everything are when you are in the field.
The second short coming of the manual is it does not tell you the why the camera is designed the way it is. Know the why will help the user to be completely familiar with the D7000 so it almost melts into the hand. Doing that requires many experiments on what each option does and does not do, then think about why is arranged the way it is. You have to think like the engineers who designed the camera to see how they intend for the camera to be used so is almost a natural extension of the photographer.
This book does not explain the different photography techniques beyond the very basics. There are vast amount of books be each specialist in every area of photography that covers techniques. Rather, this book explains how the D7000 is used as a photography tool so is seemlessly integrated with the user.
Exposure Basics:
Camera has 3 things to play with. ISO, aperature (f) and shutter speed (S). Consideration: High ISO = noise = bad. Large f number (small aperature) = high depth of field. High shutter speed=less blur (good)
Bright light camera can compensate by: ISO down, f down, S up.
Dim light camera can compensate by: ISO up, f up, S down.
The order on how the camera compensate for lighting depends on what mode it is in. Is as follows:
Auto ISO:
How the auto ISO works can be confusing, but there is a method to the madness.
When auto ISO is selected, contrary to the name, ISO can still be control by the user with the command dial or by accessing ISO change with the ISO button. Same as if Auto ISO was not on. Caveat is camera will let you change ISO as long as it can still give you correct exposure. As you change the ISO, camera will compensate with either S and/or A base on which variable is not restricted, and the camera is allowed to change on its own. Which variable is not restricted depends on whether camera is in S,A or P exposure mode. ie: Increase ISO, and camera will decrease A and/or increase S to compensate. You can change the ISO as long as the camera can compensate with S or A. If the camera can't compensate anymore, then the camera will not honor you requested ISO.
Now, you would expect the camera to let you know when you are at the limit of available ISO. However, the camera does not make it very apperent. The camera make it confusing to you. As you change the ISO, it will still show the non valid ISO number in the view finder as if you are actually changing the ISO, but soon as you press the shutter half way, ISO will jump back to where it should have been limited to. So while you are turrning the dial, the display show the new ISO, but when you press the shutter button to take the picture, ISO quietly jumps back. If you are not paying attention, you will think camera is using your new ISO when is not. Therefore, after setting an ISO you like to use, press the shutter half way for camera to meter the exposure. If it does not like your ISO, the view finder will show a new ISO number instead of the one you picked. Be sure to check the view finder after pressing the shutter half way.
The reason it does that is because the camera has a dial position memory. In the next picture if the camera can actually use your ISO, camera will go to the ISO you set. As long as camera is not turned off, it will remember where the you set the ISO, and it will go there when it can.
Changing the S and A is the camera's first line of defense to give you correct exposure while honoring the ISO setting you requested. If S and A setttings can't compensate for the ISO you requested, camera will change the ISO anywhere from low of 100 to the maximum set in the Auto ISO menu depending on whether you are shooting in too bright or too dark of an environment.
There are extreme conditions where even changing the S and/or A first, then ISO next, and the camera still cannot get to the correct exposure. More drastic action needs to be done by the camera. Will talk about extreme dark condition first. Question is what happens if camera needed more ISO than the max you set because you are shooting in a dark environment. Camera will never violate the max ISO you set no matter what. However, camera will violate the min shutter speed you set in the auto ISO menu. It does that as a last ditch effort to give you a good exposure in an dark environment.
The other end of the spectrum is in extreme bright condition. Auto ISO lets you set the max ISO, but there is no option for min ISO. That is because in auto ISO, 100 is always the lower ISO limit no matter what settings are at. As you shoot in brighter and brighter conditions, camera will lower the ISO lower and lower until is at 100 after it has already increased the shutter to max at 8,000 and aperature to min allowed by lens. After that, it will have no other tool in its arsenal to overcome the condition, and will result in over exposure.
What is good about Auto ISO:
Auto ISO gives an extra insurance against incorrect exposure. Good thing about Auto ISO is you still have full control over ISO. Camera will change ISO only if the ISO you picked does not result in correct exposure. Even then, it will adjust just enough to keep camera in proper exposure.
For absolute fool proof exposure, set Auto ISO max to the highest value, and shutter speed to the lowest value that will not give you a blurry picture. (Rule of thumb is 2 times the focal length of the lens) That way, you will almost never get the incorrect exposure. Now you can hand the camera to anyone and not get an incorrect exposure. When choosing the slowest shutter speed, be sure to pick the lowest number you can tolerate depending on how steady you can hold onto the camera. Reason for picking the lowest possible is because in a dark environment, once the camera goes down to the lowest shutter speed, it will start using higher ISO to compensate. You typically never want higher ISO than necessary because higher ISO reduce picture quality and introduce noise in the picture.
To go one step further, if the camera is to be mounted on a steady tripod, then slow shutter speed is not an issue. In that case, reduce max ISO to an acceptable value say 6400 max. That way, picture will never have too much noise. Camera will never violate max ISO no matter what. You are guarantee a good quality picture with low noise. And even if a dark condition calls for more exposure, camera will instead instead slow down shutter speed below your set minimum. Since camera is mounted on tripod anyway, slower shutter speed would still be acceptable. Therefore, set max ISO to a low value only if camera is mounted on a tripod, and you don't mind slow shutter speeds.
In P mode (Program):
Main command dial controls shutter speed and f number. Turn the command dial will raise shutter speed, S (faster shutter), and lower f (larger aperature) at the same time, or lower shutter speed, S (slower shutter), and raise f (smaller aperature). ISO is automatically at max or if user selects a lower limit, then that will be the max.
When light gets brighter: Camera does these in this order: f gets higher to compensate first. As light get even brighter, shutter speed will soon follow, and also get higher. When f and then S gets to the highest number possible, then ISO will lower. Lowest possible is 100 for ISO. (S is limited to 8000, or 1/8000 sec. f is limited to what the lens can do)
When light gets dimmer: Camera does these in this order: f gets lower to compensate first. As light get even dimmer, shutter speed will soon follow, and also get lower. f lower limit is base on what the lens can do. S lower limit is what is set in the ISO menu. After f is lowest possible, and S is at the lower set point, camera will violate the S lower set point and go even lower. However, ISO will never be higher than the max set.
In summary:
In P mode:
Bright Condition:
1.ISO at user setting.
2. S & f to compensate.
3. ISO bottom out at 100
4. Over exposure
Dim Condition:
1.ISO at user setting.
2. S & f to compensate
3.ISO at Auto max limit.
4. S drops below Min set limit.
5. Under expose
In S mode (Shutter):
Shutter is always constant base on what user sets. Min shutter speed in ISO menu has no affect in S mode.
ISO stay at max user setting or number in ISO menu, which ever is higher, until condition force it to change base on order below.
Bright Condition:
1.ISO at user setting.
2. f goes up.
3. ISO goes down until 100.
4. "HI" warning as camera over expose.
Dim Condition:
1.ISO at user setting.
2. f goes down.
3.ISO at Auto max limit.
4. "Lo" warning in view finder, and under exposure occurs.
S mode is more rigid and less forgiving than P mode since camera cannot change shutter speed for you to compensate for lighting. Watch for "HI" or "Lo" warning in the view finder.
In A mode (Aperature):
Aperature is always constant base on what user sets.
ISO stay at max user setting or number in ISO menu, which ever is higher, until condition force it to change base on order below.
Bright Condition:
1.ISO at user setting.
2. S goes up until 8000 max.
3. ISO goes down until 100 min.
4. "HI" warning as camera over expose.
Dim Condition:
1.ISO at user setting.
2. S goes down until min in ISO menu.
3. ISO goes up and violate user max setting (Assume user setting is lower than in ISO menu number) until max number in ISO menu.
4. "Lo" warning in view finder, and under exposure occurs.
In general, set Auto ISO to higher you can tolerate and still get usable pictures. Set user ISO to ideal setting. Set Auto shutter minimum speed to minimum you can tolerate.
Camera will do this in order of preference:
User ISO -> Auto Max ISO or Shutter Min -> over/under exposure.
In M mode (Manual):
ISO will be automatically selected between ISO of 100 and max ISO specified in the menu.
Exposure Control:
Main and Sub dials:
Main dial is in back of camera. Sub dial is in front.
Important Options:
f9 Reverse indicator
f6 Customize Command Dials ( Reverse rotation, main/sub dial swap, menus and playback)
Setting of f6: What happens to exposure controls when you move the finger from left to right on the two control dials.
| ISO | Shutter Speed | Aperature | Exposure | |
| f6 Set to Normal Rotation | Increase (Brighter) | Increase (Darker) | Increase (Darker) | Decrease(Darker) |
| f6 Set to Reverse Rotation | Increase (Brighter) | Decrease (Brighter) | Decrease (Brighter) | Increase (Brighter) |
Summary:
With f6 set to normal, moving the dial to the right decrease exposure while left is increase exposure. Most people don't think in reverse. Every chart in the Western world have going right to be increase. Every sales chart has going right and up to be increasing. We read from left to right. So for us people, we can set f6 to reverse. Now going right increase exposure. That feels right to most Westerners.
However, there is a reason for using normal rotation see hint below...
Hint:
Is very hard for me to think in terms of exposure. Is easier for me to think simply in terms of numbers. So I change back to normal rotation. Rotate dial to right increase the number of whatever the function is. Moving to the right increase ISO number, increase shutter speed number, increase f stop number. That is natural to me. The only function that is the problem child, and doesn't follow this scheme is exposure compensation. Right will decrease the exposure number. To remember that exposure is opposite, I set f9 to reverse exposure indicatior. Now in the view finder, the line graph for exposure has + to the right and - on the left. If I ever get confused which way to push the command dial to increase exposure, I look in the view finder and see + is on the left. I push command dial to left in increase exposure.
f6 Change main/sub
Off means main dial is used to control shutter speed and sub dial in front of camera for aperature. Recommend using the Off setting because it is easier to remember. Aperature is the diaphragm in the lens, and the lens is in front of the camera. Therefore use the front dial to control aperature. Shutter speed is controlled by the shutter mechanism in the body of the camera in the back next to the sensor, so is easy to remember shutter speed dial is the main dial in the back of the camera. That way, the layout is logical, and I always remember which dial controls A and which on for S.
f6 Menus and playback
Off,on and on (image review excluded)
During image review and image playback, use the command dial to shuffle thru the pictures and change viewing mode to display different information. Question is whether you can also use the dials to shuffle thru the picture and display different information. Many people like to use the command dial to shuffle thru pictures instead of the multi selector.
On means you can also use the main and sub dials to control the image review and playback screens. Is handy to use the dials to scroll thru the pictures since is fast. Off means you can't use dials to do that. Only the multi selector can be used to scroll and display different information.
The best option is on(image review excluded) Many times after taking a shot, and the picture is shown on the back, you see something wrong, and want to use the dials to change exposure settings. However, when you move the dial, you are just scrolling pictures instead. Therefore, use on(image review excluded) Immediately after taking a shot, when the picture is displayed in image review mode, dials can be use to adjust exposure, and you won't be scrolling thru the pictures with the dial. However, when you are not taking any shots, and press the play button to playback pictures, the dials can be used to scroll thru picture and change displayed information. Best of both worlds.
Note:
Dial position memory. The camera remembers the position of the dial. This can be a problem in P mode. Say you rotate the dial several strokes to film at 1/2000 outside. Camera remembers the dial is on 2000. If you then bring the camera inside to shoot a dark scene, the P mode will automically put the shutter to a lower number, say 1/50. You want to change it to 1/40. You rotate the dial, but nothing happens. Reason is the camera remembers that the dial is at 2000, so it will take several strokes to get back to 50, and one more click to get to 40. If you did not remember which direction to rotate the dial to decrease shutter speed, you might rotate the dial wrong way. Now it takes even more strokes to get to 50. The dial has no marking, so you are moving the dial in the dark until you get to 50, then the number will move. Moral of story is remember which way to move the dials. If you are going from outside to inside, start moving the dials while you are walking so you will be in the ball park when ready to shoot.
Pick One:
a3 easy ISO <-OR-> b3 easy exposure compensation
decision, decision, decision... One dial is used for A and S when in A, S and P modes.That leaves the second dial for something else. a3 and b3 lets you pick whether you want the second dial for ISO adjustment (a3 on) or exposure compensation (b3 on). If you are going between indoor and out, the ISO adjustment is more important. If you are always in the same location, then exposure compensation is more important. Or you can choose both a3 and b3 to be off. Prevents accidental changing of settings. If you are always shooting in same location and same lighting with no need to change ISO or exposure, then a3 and b3 off make sense. If that is the case, you should have gotten a D5100 that has only one dial :)
Auto Focus
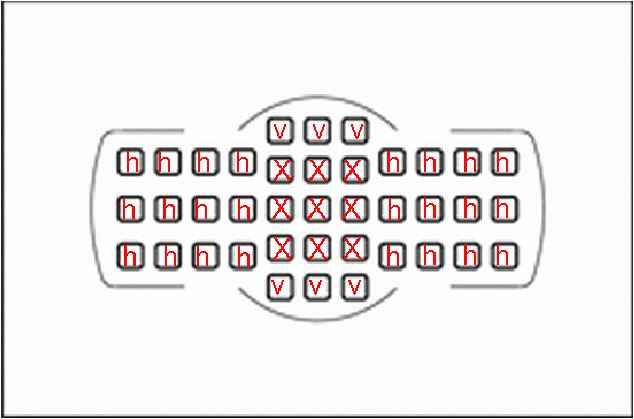
D7000 has total of 39 focus points. 9 are cross hatch, and 30 are line type. There are difference between line and cross type focus points. Cross types are more fool proof than line types.
In general, for camera to focus properly, the focus point must be pointed at a line on the subject. The line must pass thru the entire box at the focus point. View finder shows a box where the focus point will be used. The more distinct and sharp the line, the better the focus. Edge of a wall make for a good focus point. Is a distinct straight line. Carpet from far away is a bad focus point. Eventhough carpet hair has many lines, they are not long enough to extend thru the entire focus box. The camera simply sees them as indistinct short lines, and will have more trouble establishing a good focus. However, if you get down on your hands and knees and focus on one carpet strand with a macro lens, then that is a good focus point. It is a line that pass thru the focus box.
Orientation of the line is also important. If you are using the 9 center "x" focus points, orientation of line does not matter because is a cross focus point. Not all focus points on the D7000 are the more complex cross type. The rest are only line type. The disadvantage of the less sophisticated lines type is they only look for lines in a certain orientation. "h" focus point are best used for horizontal lines while "v" can are best used on vertical lines.
If you are using a "h" focus point on a horizontal line, camera will focus quickly and accurately. As you tilt the camera either direction away from horizontal, focus start to suffer. Up to 45 degree tilt, camera will hunt for a slight amount, but still focus. Beyond 45 degree, camera may never focus. For "h" focus points, look for lines that are horizontal, and up to 45 degree angled away from horizontal in either direction. Note, horizontal is relative to camera. If camera is held in vertical portrait position, horizontal is now vertical.
One way to remember which focus points are horizontal and which are vertical is the shape of the rectangle that make up the entire focus zone. The rectangle is laying in a horizontal position. Therefore, all the focus points in the rectangle are horizontal points except for the 9 central points. The 6 other points that are on top and below the center 9 points are vertical. Remember that by the fact they form a vertical rectangle. Know which focus areas are vertical and horizontal lets you take full advantage of them.
AF-C Mode: This is the most useful mode. Camera continue to focus on the object even as the shutter be being release. As the mirror flips out of the way, and picture is being taken, camera will try to continue to focus on the object. When the mirror flips out of the way, autofocus can not see the object anymore, but it will use predictive focus base on the last know speed of the object to estimate the focus distance.
The AF-C mode have multiple options. Each has its advantage and disadvantage.
Single point use just one of the 39 points. Move the focus point by using the arrows on the joystick pad. The lever below the arrow pad need to be on the dot. L means you cannot move the focus point. Careful when you select points that are not "x". Camera will need lines oriented in proper orientation to focus.
Can select 11 or 39 point feature. That allows you to move the focus point across the screen with fewer clicks.
9,21 or 39 points dynamic-area AF:
With single point focus area, camera focus on what is at the focus point. If the object moves out of the focus point, camear will focus on something new that is now at the focus point.
This is where multiple points dynamic focus comes in. Question is since the camera has 39 focus points, can the camera use another focus point to maintain focus on the object if the object has moved away from the main focus point. Yes it can. You use the main focus point in the center to establish focus (main focus point can be moved with the joystick). What the camera will do is remember the distance to the object and check other focus points that also show the same distance to the object. It has some logic in the camera to assume other points are on the same object if they have the same distance. Now when the object moves away from the main focus point, the camera will use other back up focus points to keep focused on the object. As the object moves closer or further, camera will continue to keep focus with the backup focus points. Dynamic focus is good for fast moving object that randomly change directions. You don't have to constantly keep the main focus point on the object.
The dynamic AF is not fool proof when using alternate focus points. As long as the alternate focus points can keep track of the object and keep it in focus, the camera will continue to use the alternate focus points. However, for some reason if the back up focus points loose track of the object, camera will establish a new focus. Say object has moved far left or right where camera only focus on lines are are near horizontal. If the object only have vertical lines, camera will not be able to focus on the object anymore. Camera will then dump the object, and use the main focus point to establish a new focus. Therefore, sometimes when using dynamic AF, the camera will suddenly focus on the background instead of the object you are trying to track.
Second potential issue with dynamic tracking is the backup focus points may be tracking the wrong object. Two objects are same distance to camera. Camera thinks they are both the same object and tracks them both. Main object moved slightly off to the side and away from the camera. Camera may still be tracking the wrong stationary object.
One way Nikon fight the second issue is option to reduce the number of tracking points. Less confusion to the camera. Use 9 or 21 points instead of 39 points. That lessen the chance that the camera is tracking the wrong object.
Second way Nikon fight the incorrect tracking issue is 3D tracking. 3D tracking use the color of the object in the focus point to figure out what is the object and what is not. Works especially good if the object has a different color than the background. However, if the object is about the same color as the background, then 3D tracking is not much better than 39 points tracking. You have the same issue of too many focus points to confuse the camera.
Auto-area AF:
This mode selects the focus area automatically. It will select the object cloest to the camera that it can focus on. However, object can be close to the camera, but if it cannot focus on it, it will not select it. If object only have distinct vertical lines, and in the field of view of horizontal focus points, then that object will be ignored. This mode is good for many situations where you are shooting people. Probably the mode to be in if you are handing the camera to another person to shoot, and you want to stand to the side of the picture.
Best Post Processing Software:
Nikon camera RAW files is in .nef format. They are called NEF files. Unlike Canon, Nikon RAW files are proprietary, and can only be properly processed by Nikon software. Three Nikon softwares are available, View NX2, Capture NX-D, which are similar, and are free and the Capture NX2 which cost around $130. The main thing you are getting on the Capture NX2 is the U-point technology. Lets you pick a color and the size of the edit area, and the software applies the setting just to that color inside the circle. I will somewhat change the area outside the circle, and other colors to some degree as well to make the picture looks natural. The amazing thing about the u-point technology is that the results looks very natural. Is highly acclaimed, and many people use the Capture NX2 over photoshop.
Realized that the excellent Capture NX-D program does not work with the D810 camera, keep that in mind before upgrading. Another thing to realize is that Photoshop only works with .jpg or other common file configurations. Photoshop does not support Nikon NEF files. Photoshop does have an Adobe DNG Converter, however, the converted results looks a little funky and spotchy. The converter is just not as good as native Nikon software.
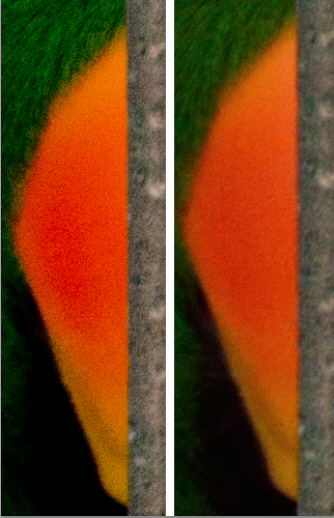
Section of a picture of a parot's beak. Left is NEF file converted to Photoshop. Right is NEF file in native Nikon software. Something is definitely lost when Photoshop tries to use Nikon NEF file. The loss of fidelity gets worse when you try to lighten up shadow area or work with the file. Definitely use Nikon's software until you are close to what you want, then use Photoshop.
Nikon has undocumeted pixel mapping by doing two consecutive cleaning.
Best SD Card for D7000.
D600 Teardown: https://www.ifixit.com/Teardown/Nikon+D600+Teardown/10708#sthash.rjgQsytW.dpuf
Wasabi Battery for D7000. Amazon.com
Nikon D7000 Hacks.